Administration
Introduction
This section covers an overview of the ERP as well as the details of the features that come under the Administrator purview, which is mostly done once when the system is made up or when there is some change in the setups.
Prerequisites
Log in to the system with a user who has "Super User" role access.
Domain names configured for each city. If its a statewide implementation, then have one main domain for the state and one subdomain each per city.
Functionality
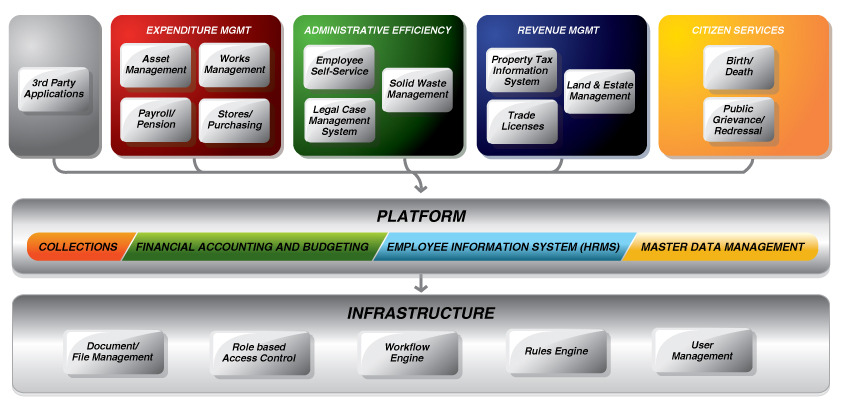
Functional architecture of eGov ERP
City or State Set up
Each city will have a dedicated URL based on the subdomain configured. All city specific details can be captured here including the logo. All information can be updated through the screen provided from the City Set up. Each instance will ideally have one data for city master.
Similarly, the state details can also be set up here. In BPA, stakeholder activities are mostly done at the state-level and hence state set up is mandatory.
Role
Multiple roles can be created in the system based on the access control required. Each role is for a specific purpose.
User Management
Users in the system belong to basically three categories- Citizens, Employees and Business users. Each user can be assigned to a list of roles and authorization will be done in the system based on this mapping. Any role can be added or removed from a user using this feature at any point in time. Data will be present in eg_userrole table.
Boundary set up
Each state or city will have its own specific boundary definitions. The system allows configuring multiple hierarchies, which in turn can define a boundary type and then the actual boundary master. For instance, in a state, the boundary limits will be different for administration and elections. The system enables us to configure a different set of hierarchy for each of these. Also, there is a provision to link different hierarchies which will enable the system to get the data across hierarchies.
Authorization setting
The system enables to have access control on each and every URL accessed. This is achieved by having all the URLs in a table (eg_action) and then mapping each of these actions to authorized roles in another table (eg_roleaction). Every action needs to be mapped to all the roles to which access rights are granted. Once this is ready, any user created in the system, with a specific role mapped to it, will get access to all the URLs mapped under those roles.
Menu tree in the applications will be loaded based on all these mappings. Each user in the system will see a personalized menu tree list based on the mapped roles.
Department
All the departments in the state or city will be defined in the Department master. Each department will have a unique department code.
Configurations and Setup
For the sever to come up for a specific city, an entry needs to be made in the eg_city table with proper domain URL. This is the very first thing that needs to be done as part of the system set up.
Boundary set up:
- Define the possible hierarchy types in the Hierarchy Master
- Define the boundary types for each hierarchy in the Boundary Type Master
- Define the actual boundary data for each of the Boundary Type in the Boundary Master.
Authorization set up:
- Define the high-level menu tree nodes or module structure using the eg_module. There is a parent-child mapping here to enable tree structure.
- Define all the URLs with unique names and full URL path in eg_action. All actions will have a reference to the module.
- Any URLs that need to be disabled can be marked as isenabled as false. In which case the same link will not be shown on the menu tree.
- Map the actions to authorized role(s) in eg_roleaction
- Map the user to appropriate roles in eg_userrole

